ApplicationContext
统一资源加载策略
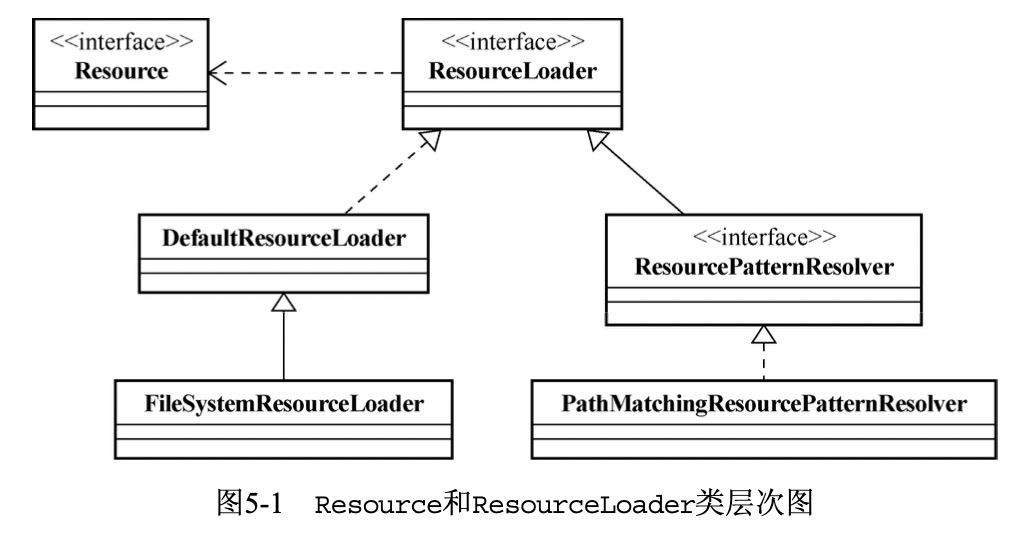
Spring提出了一套基于org.springframework.core.io.Resource和 org.springframework.core.io.ResourceLoader接口的资源抽象和加载策略。
其中ClassPathResource就是Resource的一个特定类型的实现,代表的是位于Classpath中的资源。 Resource接口可以根据资源的不同类型,或者资源所处的不同场合,给出相应的具体实现。Spring 框架在这个理念的基础上,提供了一些实现类(可以在org.springframework.core.io包下找到这些实现类)。
-
ByteArrayResource。将字节(byte)数组提供的数据作为一种资源进行封装,如果通过InputStream形式访问该类型的资源,该实现会根据字节数组的数据,构造相应的ByteArrayInputStream并返回。
-
ClassPathResource。该实现从Java应用程序的ClassPath中加载具体资源并进行封装,可以使用指定的类加载器(ClassLoader)或者给定的类进行资源加载。
-
FileSystemResource。对java.io.File类型的封装,所以,我们可以以文件或者URL的形式对该类型资源进行访问,只要能跟File打的交道,基本上跟FileSystemResource也可以。
-
UrlResource。通过java.net.URL进行的具体资源查找定位的实现类,内部委派URL进行具体的资源操作。
-
InputStreamResource。将给定的InputStream视为一种资源的Resource实现类,较为少用。
如果以上这些资源实现还不能满足要求,那么我们还可以根据相应场景给出自己的实现,只需实现org.springframework.core.io.Resource接口
ResourceLoader
资源是有了,但如何去查找和定位这些资源,则应该是ResourceLoader的职责所在了。org.spr- ingframework.core.io.ResourceLoader接口是资源查找定位策略的统一抽象,具体的资源查找定 位策略则由相应的ResourceLoader实现类给出。
public interface ResourceLoader {
	String CLASSPATH_URL_PREFIX = ResourceUtils.CLASSPATH_URL_PREFIX; Resource getResource(String location);
  //我们就可以根 据指定的资源位置,定位到具体的资源实例。
	ClassLoader getClassLoader();
}
1. 可用的ResourceLoader
- DefaultResourceLoader
ResourceLoader默认的实现类,即org.springframework.core.io.DefaultResourceLoader,该类默认的资源查找处理逻辑如下。
(1) 首先检查资源路径是否以classpath:前缀打头,如果是,则尝试构造ClassPathResource类 型资源并返回。
(2) 否则,(a) 尝试通过URL,根据资源路径来定位资源,如果没有抛出MalformedURLException, 有则会构造UrlResource类型的资源并返回;(b)如果还是无法根据资源路径定位指定的资源,则委派 getResourceByPath(String) 方 法 来 定 位 , DefaultResourceLoader 的 getResourceByPath(String)方法默认实现逻辑是,构造ClassPathResource类型的资源并返回。
- FileSystemResourceLoader
为了避免DefaultResourceLoader在最后getResourceByPath(String)方法上的不恰当处理,
我们可以使用org.springframework.core.io.FileSystemResourceLoader,它继承自DefaultResourceLoader,但覆写了getResourceByPath(String)方法,使之从文件系统加载资源并以 FileSystemResource类型返回。
2. ResourcePatternResolver —批量查找的ResourceLoader
ResourcePatternResolver是ResourceLoader的扩展,ResourceLoader每次只能根据资源路径返回确定的单个Resource实例,而ResourcePatternResolver则可以根据指定的资源路径匹配模式, 每次返回多个Resource实例。
- org.springframework.core.io.support.ResourcePatternResolver定义如下:
public interface ResourcePatternResolver extends ResourceLoader {
  String CLASSPATH_ALL_URL_PREFIX = "classpath*:";
  //集合
 	Resource[] getResources(String locationPattern) throws IOException;
}
ResourcePatternResolver在继承ResourceLoader原有定义的基础上,又引入了Resource[] getResources(String)方法定义,以支持根据路径匹配模式返回多个Resources的功能。它同时还引入了一种新的协议前缀classpath*:,针对这一点的支持,将由相应的子类实现给出。
- org.springframework.core.io.support. PathMatchingResourcePatternResolver,该实现类支持ResourceLoader级别的资源加载,支持基 于Ant风格的路径匹配模式(类似于**/.suffix之类的路径形式),支持ResourcePatternResolver新 增加的classpath:前缀等,基本上集所有技能于一身。
- 在构造PathMatchingResourcePatternResolver实例的时候,可以指定一个ResourceLoader
- 如果不指定的话内部会默认构造一个DefaultResourceLoader实例。PathMatchingResourcePatternResolver内部会将匹配后确定的资源路径, 委派给它的ResourceLoader来查找和定位资源。
- 这样,如果不指定任何ResourceLoader的话,PathMatchingResourcePatternResolver在加载资源的行为上会与DefaultResourceLoader基本相同, 只存在返回的Resource数量上的差异。
- 可以通过传入其他类型的ResourceLoader来替换PathMatchingResourcePatternResolver 内部默认使用的DefaultResourceLoader,从而改变其默认行为。
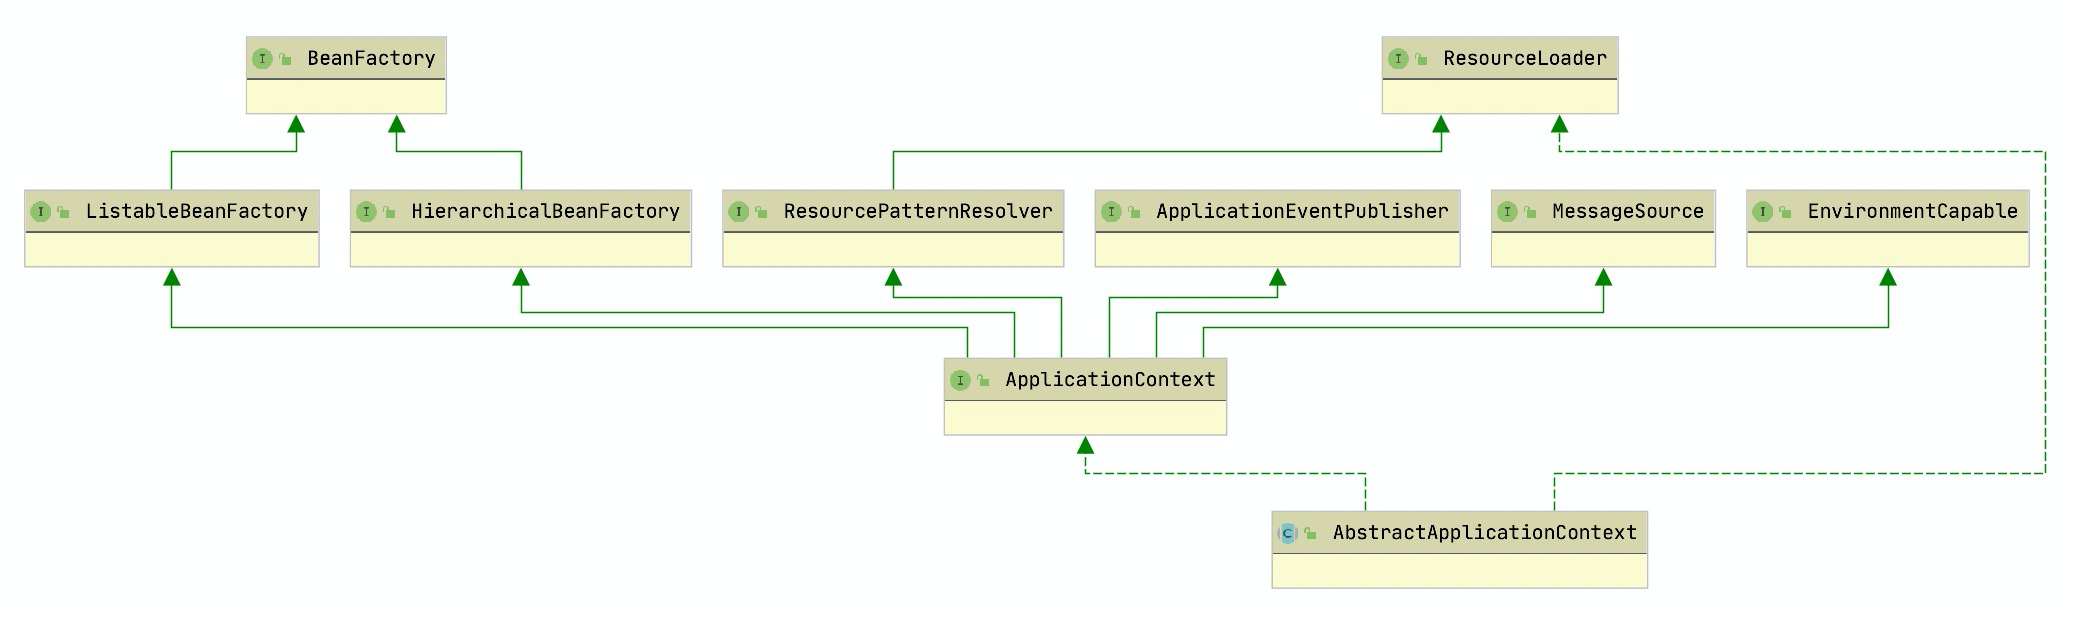
ApplicationContext的实现类在作为ResourceLoader或者ResourcePatternResolver时候的行为,完全就是委派给了PathMatchingResourcePatternResolver和DefaultResourceLoader来做。
下面给出涉及到的几个类的源文件省略不相干代码
public interface ApplicationContext extends EnvironmentCapable, ListableBeanFactory, HierarchicalBeanFactory,
		MessageSource, ApplicationEventPublisher, ResourcePatternResolver {
}
public interface ResourcePatternResolver extends ResourceLoader {
	/**
	 * 新的匹配规则
	 */
	String CLASSPATH_ALL_URL_PREFIX = "classpath*:";
	/**
	 * 获取资源接口
	 */
	Resource[] getResources(String locationPattern) throws IOException;
}
public interface ResourceLoader {

	/** classpath:". */
	String CLASSPATH_URL_PREFIX = ResourceUtils.CLASSPATH_URL_PREFIX;

	Resource getResource(String location);

	/**
	 * 去加载文件的类加载器
	 */
	@Nullable
	ClassLoader getClassLoader();
}
public abstract class AbstractApplicationContext extends DefaultResourceLoader
		implements ConfigurableApplicationContext {

	/**
	 * 批量读取配置
	 */
	private ResourcePatternResolver resourcePatternResolver;

	public AbstractApplicationContext() {
		this.resourcePatternResolver = getResourcePatternResolver();
	}

	public AbstractApplicationContext(@Nullable ApplicationContext parent) {
		this();
		setParent(parent);
	}

  protected ResourcePatternResolver getResourcePatternResolver() {
		return new PathMatchingResourcePatternResolver(this);
	}

	//---------------------------------------------------------------------
	// Implementation of ResourcePatternResolver interface
	//---------------------------------------------------------------------

	@Override
	public Resource[] getResources(String locationPattern) throws IOException {
		return this.resourcePatternResolver.getResources(locationPattern);
	}
}
笔记
抽象类AbstractApplicationContext的getResources接口通过委派给resourcePatternResolver来进行实现
而抽象类的resourcePatternResolver是构造方法中调用方法getResourcePatternResolver返回的
这个方法的实现,是自己new出来一个PathMatchingResourcePatternResolver
在new PathMatchingResourcePatternResolver时需要一个ResourceLoader来为自己服务,并将查询的任务委派给它
在PathMatchingResourcePatternResolver类构造时默认是new一个DefaultResourceLoader类作为ResourceLoader
如果你传了ResourceLoader呢就用你传的。
但是AbstractApplicationContext继承了DefaultResourceLoader因此在getResourcePatternResolver方法中new PathMatchingResourcePatternResolver时将自己传给PathMatchingResourcePatternResolver类
public class PathMatchingResourcePatternResolver implements ResourcePatternResolver {
	private final ResourceLoader resourceLoader;

	public PathMatchingResourcePatternResolver() {
		this.resourceLoader = new DefaultResourceLoader();
	}

	public PathMatchingResourcePatternResolver(ResourceLoader resourceLoader) {
		Assert.notNull(resourceLoader, "ResourceLoader must not be null");
		this.resourceLoader = resourceLoader;
	}

	public PathMatchingResourcePatternResolver(@Nullable ClassLoader classLoader) {
		this.resourceLoader = new DefaultResourceLoader(classLoader);
	}

	@Override
	public Resource getResource(String location) {
		return getResourceLoader().getResource(location);
	}

  public ResourceLoader getResourceLoader() {
		return this.resourceLoader;
	}

	@Override
	public Resource[] getResources(String locationPattern) throws IOException {
			... ...
      return new Resource[] {getResourceLoader().getResource(locationPattern)};
	}

}
public class DefaultResourceLoader implements ResourceLoader {

	@Override
	public Resource getResource(String location) {

	}
}
因此ApplicationContext的实现类都通过委派ResourcePatternResolver去加载资源,在应用中可以通过Aware或者直接Autowire方式注入进来。
3.Resource类型的注入
容器可以将bean定义文件中的字符串形式表达的信息,正确地转换成具体对象定 义的依赖类型。
对于那些Spring容器提供的默认的PropertyEditors无法识别的对象类型,我们可以提供自定义的PropertyEditor实现并注册到容器中,以供容器做类型转换的时候使用。
默认情况下, BeanFactory容器不会为org.springframework.core.io.Resource类型提供相应的PropertyEditor,所以,如果我们想注入Resource类型的bean定义,就需要注册自定义的PropertyEditor到 BeanFactory容器。
不过,对于ApplicationContext来说,我们无需这么做,因为ApplicationContext容器可以正确识别Resource类型并转换后注入相关对象。
import org.springframework.core.io.Resource;

import java.io.BufferedReader;
import java.io.FileReader;
import java.io.IOException;

public class Service {

	private Resource resource;

	public String getInfo(){
		try {
			String line = new BufferedReader(new FileReader(resource.getFile())).readLine();
			return line;
		} catch (IOException ignored) {
		}
		return null;
	}

	public void setResource(Resource resource) {
		this.resource = resource;
	}
}

//---
//输出
NAME=ZS
import org.springframework.core.io.Resource;

import java.io.BufferedReader;
import java.io.FileReader;
import java.io.IOException;

public class Service {

	private Resource resource;

	public String getInfo(){
		try {
			String line = new BufferedReader(new FileReader(resource.getFile())).readLine();
			return line;
		} catch (IOException ignored) {
		}
		return null;
	}

	public void setResource(Resource resource) {
		this.resource = resource;
	}
}
<beans xmlns="http://www.springframework.org/schema/beans" xmlns:xsi="http://www.w3.org/2001/XMLSchema-instance"
	   xmlns:aop="http://www.springframework.org/schema/aop" xsi:schemaLocation="http://www.springframework.org/schema/beans
		http://www.springframework.org/schema/beans/spring-beans-2.0.xsd http://www.springframework.org/schema/aop http://www.springframework.org/schema/aop/spring-aop-2.0.xsd">


	<bean class="com.mm.demo.factory.resource.Service">
		<property name="resource" value="../resources/Resource.conf"/>
	</bean>

</beans>
NAME=ZS
ApplicationContext启动伊始,会通过一个org.springframework.beans.support.ResourceEditorRegistrar来注册Spring提供的针对Resource类型的PropertyEditor实现到容器中,这个 PropertyEditor 叫 做 org.springframework.core.io.ResourceEditor。 这 样 , ApplicationContext就可以正确地识别Resource类型的依赖了。
public interface PropertyEditorRegistrar {
	void registerCustomEditors(PropertyEditorRegistry registry);
}
public class ResourceEditorRegistrar implements PropertyEditorRegistrar {

	private final PropertyResolver propertyResolver;

	private final ResourceLoader resourceLoader;

	public ResourceEditorRegistrar(ResourceLoader resourceLoader, PropertyResolver propertyResolver) {
		this.resourceLoader = resourceLoader;
		this.propertyResolver = propertyResolver;
	}

	@Override
	public void registerCustomEditors(PropertyEditorRegistry registry) {
		ResourceEditor baseEditor = new ResourceEditor(this.resourceLoader, this.propertyResolver);
		doRegisterEditor(registry, Resource.class, baseEditor);//此处注册进容器
		doRegisterEditor(registry, ContextResource.class, baseEditor);
		doRegisterEditor(registry, InputStream.class, new InputStreamEditor(baseEditor));
		doRegisterEditor(registry, InputSource.class, new InputSourceEditor(baseEditor));
		doRegisterEditor(registry, File.class, new FileEditor(baseEditor));
		doRegisterEditor(registry, Path.class, new PathEditor(baseEditor));
		doRegisterEditor(registry, Reader.class, new ReaderEditor(baseEditor));
		doRegisterEditor(registry, URL.class, new URLEditor(baseEditor));

		ClassLoader classLoader = this.resourceLoader.getClassLoader();
		doRegisterEditor(registry, URI.class, new URIEditor(classLoader));
		doRegisterEditor(registry, Class.class, new ClassEditor(classLoader));
		doRegisterEditor(registry, Class[].class, new ClassArrayEditor(classLoader));

		if (this.resourceLoader instanceof ResourcePatternResolver) {
			doRegisterEditor(registry, Resource[].class,
					new ResourceArrayPropertyEditor((ResourcePatternResolver) this.resourceLoader,
          this.propertyResolver));
		}
	}

	private void doRegisterEditor(PropertyEditorRegistry registry, Class<?> requiredType, PropertyEditor editor) {
		if (registry instanceof PropertyEditorRegistrySupport) {
			((PropertyEditorRegistrySupport) registry).overrideDefaultEditor(requiredType, editor);
		}
		else {
			registry.registerCustomEditor(requiredType, editor);
		}
	}

}
笔记
String类型通过ResourceEditor进行转换后成为Resource类型注入到实现类中,那么ResourceEditor是何时发挥作用的呢?
国际化信息支持
1. Locale
不同的Locale代表不同的国家和地区,每个国家和地区在Locale这里都有相应的简写代码表示,
包括语言代码以及国家代码,这些代码是ISO标准代码。
Locale(String language)
Locale(String language, String country)
Locale(String language, String country, String variant)
常用的Locale都提供有静态常量,不用我们自己重新构造。一些不常用的Locale的则需要根据相应的国家和地区以及语言来进行构造。有了Locale,我们的应用程序就可以通过它来判别如何为不同的国家和地区的用户提供相应的信息。
2. ResourceBundle
ResourceBundle用来保存特定于某个Locale的信息(可以是String类型信息,也可以是任何类型 的对象)。通常,ResourceBundle管理一组信息序列,所有的信息序列有统一的一个basename,然后 特定的Locale的信息,可以根据basename后追加的语言或者地区代码来区分。
比如,我们用一组properties文件来分别保存不同国家地区的信息,可以像下面这样来命名相应的properties文件:
messages.properties
messages_zh.properties
messages_zh_CN.properties
messages_en.properties
messages_en_US.properties
其中,文件名中的messages部分称作ResourceBundle将加载的资源的basename,其他语言或地 区的资源在basename的基础上追加Locale特定代码。
有了ResourceBundle对应的资源文件之后,我们就可以通过ResourceBundle的getBundle (String baseName, Locale locale)方法取得不同Locale对应的ResourceBundle,然后根据资源 的键取得相应Locale的资源条目内容。
通过结合ResourceBundle和Locale,我们就能够实现应用程序的国际化信息支持。
3.MessageSource与ApplicationContext
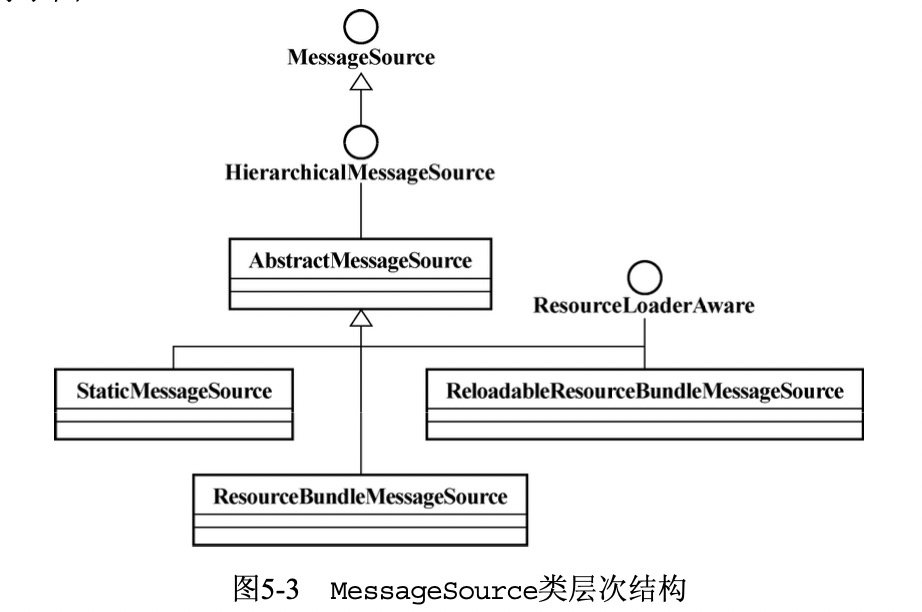
Spring在Java SE的国际化支持的基础上,进一步抽象了国际化信息的访问接口,也就是 org.springframework.context.MessageSource
public interface MessageSource {

	@Nullable
	String getMessage(String code, @Nullable Object[] args, @Nullable String defaultMessage, Locale locale);

	String getMessage(String code, @Nullable Object[] args, Locale locale) throws NoSuchMessageException;

	String getMessage(MessageSourceResolvable resolvable, Locale locale) throws NoSuchMessageException;
}
通过该接口,我们统一了国际化信息的访问方式。传入相应的Locale、资源的键以及相应参数, 就可以取得相应的信息,再也不用先根据Locale取得ResourceBundle,然后再从ResourceBundle查 询信息了。对MessageSource所提供的三个方法的简单说明如下。
现在我们知道,ApplicationContext除了实现了ResourceLoader以支持统一的资源加载,它还 实现了MessageSource接口,那么就跟ApplicationContext因为实现了ResourceLoader而可以当作ResourceLoader来使用一样,ApplicationContext现在也是一个MessageSource了。
在默认情况下,ApplicationContext将委派容器中一个名称为messageSource的MessageSource接口实现来完成MessageSource应该完成的职责。如果找不到这样一个名字的MessageSource 实现,ApplicationContext内部会默认实例化一个不含任何内容的StaticMessageSource实例,以保证相应的方法调用。
public abstract class AbstractApplicationContext extends DefaultResourceLoader
		implements ConfigurableApplicationContext {

  public static final String MESSAGE_SOURCE_BEAN_NAME = "messageSource";

  @Override
	public void refresh() throws BeansException, IllegalStateException {
		synchronized (this.startupShutdownMonitor) {
			... ...
			try {
				... ...
				initMessageSource();
				... ...
			}catch (BeansException ex) {}finally {}
		}
	}

  protected void initMessageSource() {
		ConfigurableListableBeanFactory beanFactory = getBeanFactory();
		if (beanFactory.containsLocalBean(MESSAGE_SOURCE_BEAN_NAME)) {
			this.messageSource = beanFactory.getBean(MESSAGE_SOURCE_BEAN_NAME, MessageSource.class);
			... ...
		}
		else {
			DelegatingMessageSource dms = new DelegatingMessageSource();
      ... ...
		}
	}
}
1. 可用的MessageSource实现
-
org.springframework.context.support.StaticMessageSource。MessageSource接口的 15 简单实现,可以通过编程的方式添加信息条目,多用于测试,不应该用于正式的生产环境
-
org.springframework.context.support.ResourceBundleMessageSource。基于标准的 java.util.ResourceBundle而实现的MessageSource,对其父类AbstractMessageSource 的行为进行了扩展,提供对多个ResourceBundle的缓存以提高查询速度。同时,对于参数化 的信息和非参数化信息的处理进行了优化,并对用于参数化信息格式化的MessageFormat实例也进行了缓存。它是最常用的、用于正式生产环境下的MessageSource实现。
-
org.springframework.context.support.ReloadableResourceBundleMessageSource 。
同样基于标准的java.util.ResourceBundle而构建的MessageSource实现类,但通过其 cacheSeconds属性可以指定时间段,以定期刷新并检查底层的properties资源文件是否有变更。 对于properties资源文件的加载方式也与ResourceBundleMessageSource有所不同,可以通过 ResourceLoader来加载信息资源文件。使用ReloadableResourceBundleMessageSource时, 应该避免将信息资源文件放到classpath中,因为这无助于ReloadableResourceBundle- MessageSource定期加载文件变更。
这三种实现都可以独立于容器并在独立运行(Standalone形式)的应用程序中使用,而并非只能 依托ApplicationContext才可使用。
如果说以上三种MessageSource的实现还是不能满足你的要求,那么直接继承AbstractMessageSource,然后覆写几个方法就行了,甚至可以直接实现MessageSource接口,如果你的需求 真的那么特别。
2. MessageSourceAware和MessageSource的注入
ApplicationContext启动的时候,会自动识别容器中类型为MessageSourceAware的bean定义,
并将自身作为MessageSource注入相应对象实例中。如果某个业务对象需要国际化的信息支持,那么 最简单的办法就是让它实现MessageSourceAware接口,然后注册到ApplicationContext容器。不过 这样一来,该业务对象对ApplicationContext容器的依赖性就太强了,显得容器具有较强的侵入性。
而实际上,如果真的某个业务对象需要依赖于MessageSource的话,直接通过构造方法注入或者 setter方法注入的方式声明依赖就可以了。只要配置bean定义时,将ApplicationContext容器内部的 那个messageSource注入该业务对象即可。
既然MessageSource可以独立使用,那为什么还让ApplicationContext实现该接口呢?在独立运行的应用程序(Standalone Application)中,就如我们上面这些应用场景所展示的那样,直接使用 MessageSource的相应实现类就行了。不过在Web应用程序中,通常会公开ApplicationContext给视图(View)层,这样,通过标签(tag)就可以直接访问国际化信息了。
如果将MessageSource类+配置平台或者国际化平台实现热加载方式会不会更符合当下情况
容器内部事件发布
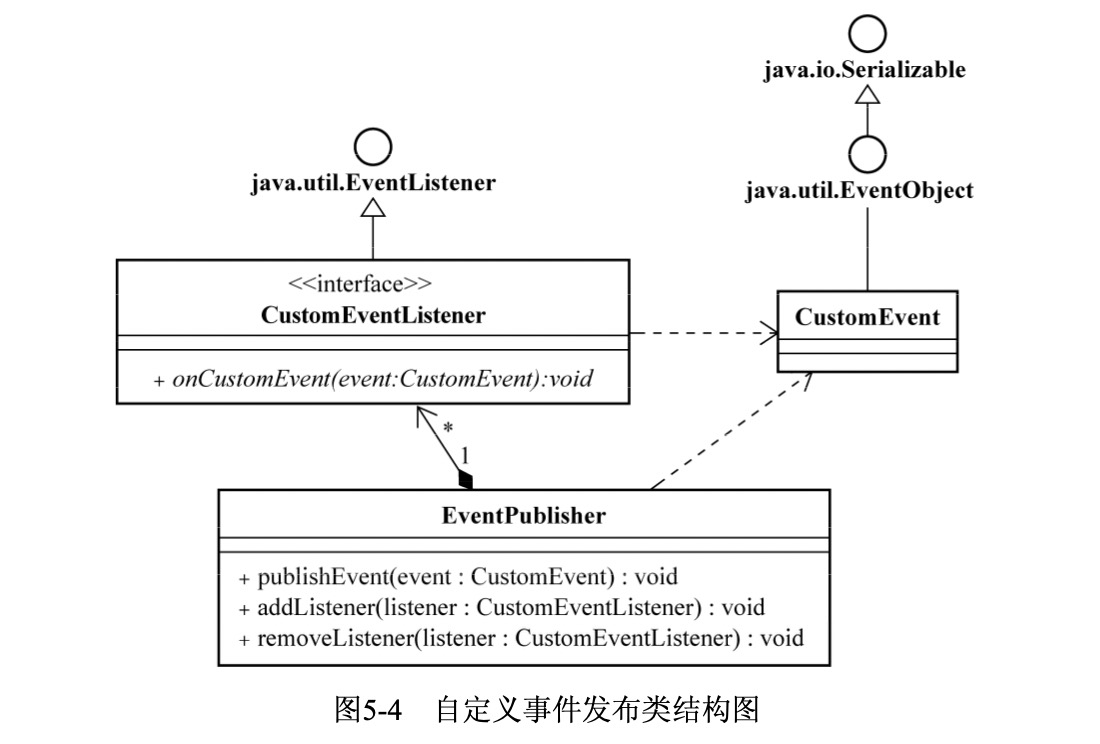
Spring的ApplicationContext容器提供的容器内事件发布功能,是通过提供一套基于Java SE标 准自定义事件类而实现的。为了更好地了解这组自定义事件类,我们可以先从Java SE的标准自定义事件类实现的推荐流程说起。
Java SE提供了实现自定义事件发布(Custom Event publication)功能的基础类,即java.util.Eve- ntObject类和java.util.EventListener接口。
import java.util.EventListener;

public interface MethodExecutionEventListener extends EventListener {
	/**
	 * 处理方法开始执行的时候发布的MethodExecutionEvent事件
	 */
	void onMethodBegin(MethodExecutionEvent evt);

	/**
	 * 处理方法执行将结束时候发布的MethodExecutionEvent事件
	 */
	void onMethodEnd(MethodExecutionEvent evt);

	/**
	 * 处理方法执行异常时候发布的MethodExecutionEvent事件
	 */
	void onMethodError(MethodExecutionEvent evt,Throwable t);
}
import java.util.EventObject;

/**
 * 自定义事件
 */
public class MethodExecutionEvent extends EventObject {
	private static final long serialVersionUID = -71960369269303337L;
	private String methodName;

	public MethodExecutionEvent(Object source) {
		super(source);
	}

	public MethodExecutionEvent(Object source, String methodName) {
		super(source);
		this.methodName = methodName;
	}

	public String getMethodName() {
		return methodName;
	}

	public void setMethodName(String methodName) {
		this.methodName = methodName;
	}
}
public enum MethodExecutionStatus {
	BEGIN,
	END,
	ERROR;
}
public class SimpleMethodExecutionEventListener implements MethodExecutionEventListener {

	public void onMethodBegin(MethodExecutionEvent evt) {
		String methodName = evt.getMethodName();
		Log.out("收到方法开始执行事件:[" + methodName + "].");
	}

	public void onMethodEnd(MethodExecutionEvent evt) {
		String methodName = evt.getMethodName();
		Log.out("收到方法结束执行事件:[" + methodName + "].");
	}

	@Override
	public void onMethodError(MethodExecutionEvent evt, Throwable t) {
		String methodName = evt.getMethodName();
		Log.out("收到方法异常事件:[" + methodName + "," + t.getMessage() + "].");
	}
}
import java.util.ArrayList;
import java.util.List;

public class MethodExeuctionEventPublisher {
	private List<MethodExecutionEventListener> listeners = new ArrayList<MethodExecutionEventListener>();

	public void methodToMonitor() {
		MethodExecutionEvent event2Publish = new MethodExecutionEvent(this, "自定义方法监控");
		publishEvent(MethodExecutionStatus.BEGIN, event2Publish, null);
		try {
			// 执行实际的方法逻辑
			Log.out("执行实际的方法逻辑");
			int a = 1 / 0;
		} catch (Exception e) {
			publishEvent(MethodExecutionStatus.ERROR, event2Publish, e);
		}
		publishEvent(MethodExecutionStatus.END, event2Publish, null);
	}

	protected void publishEvent(MethodExecutionStatus status, MethodExecutionEvent methodExecutionEvent, Throwable t) {
		List<MethodExecutionEventListener> copyListeners = new ArrayList<MethodExecutionEventListener>(listeners);
		for (MethodExecutionEventListener listener : copyListeners) {
			if (MethodExecutionStatus.BEGIN.equals(status)) listener.onMethodBegin(methodExecutionEvent);
			else if (MethodExecutionStatus.END.equals(status)) listener.onMethodEnd(methodExecutionEvent);
			else listener.onMethodError(methodExecutionEvent, t);
		}
	}

	public void addMethodExecutionEventListener(MethodExecutionEventListener listener) {
		this.listeners.add(listener);
	}

	public void removeListener(MethodExecutionEventListener listener) {
		if (this.listeners.contains(listener)) this.listeners.remove(listener);
	}

	public void removeAllListeners() {
		this.listeners.clear();
	}

	public static void main(String[] args) {
		MethodExeuctionEventPublisher eventPublisher = new MethodExeuctionEventPublisher();
		eventPublisher.addMethodExecutionEventListener(new SimpleMethodExecutionEventListener());
		eventPublisher.methodToMonitor();
	}
}

//------
//输出
 0  |  收到方法开始执行事件:[自定义方法监控].
 1  |  执行实际的方法逻辑
 2  |  收到方法异常事件:[自定义方法监控,/ by zero].
 3  |  收到方法结束执行事件:[自定义方法监控].
Spring 的容器内事件发布类结构分析
Spring 的 ApplicationContext容器内部允许以 org.springframework.context.ApplicationEvent的形式发布事件 ,容器内注册的org.springframework.context.ApplicationListener类型的bean定义会被ApplicationContext容器自动识别,它们负责监听容器内发布的所有ApplicationEvent类型的事件。也就是说,一旦容器内发布ApplicationEvent及其子类型的事件, 注册到容器的ApplicationListener就会对这些事件进行处理。
ApplicationEvent
Spring容器内自定义事件类型,继承自java.util.EventObject,它是一个抽象类,需要根据情况提供相应子类以区分不同情况。默认情况下,Spring提供了三个实现。
- ContextClosedEvent:ApplicationContext容器在即将关闭的时候发布的事件类型。
- ContextRefreshedEvent:ApplicationContext容器在初始化或者刷新的时候发布的事件类型。
- RequestHandledEvent:Web请求处理后发布的事件,其有一子类ServletRequestHandledEvent提供特定于Java EE的Servlet相关事件。
ApplicationListener
ApplicationContext容器内使用的自定义事件监听器接口定义,继承自java.util.EventListener。ApplicationContext容器在启动时,会自动识别并加载EventListener类型bean定义, 一旦容器内有事件发布,将通知这些注册到容器的EventListener。
ApplicationContext
还记得ApplicationContext的定义吧?除了之前的ResourceLoader和MessageSource,ApplicationContext接口定义还继承了ApplicationEventPublisher接口,该接口提供了void publishEvent(ApplicationEvent event)方法定义。不难看出,ApplicationContext容器现在担当的就是 事件发布者的角色。
虽然ApplicationContext继承了ApplicationEventPublisher接口而担当了事件发布者的角色,但是在具体实现上,与之前提到的自定义事件实现流程有些许差异,且让我一一道来......
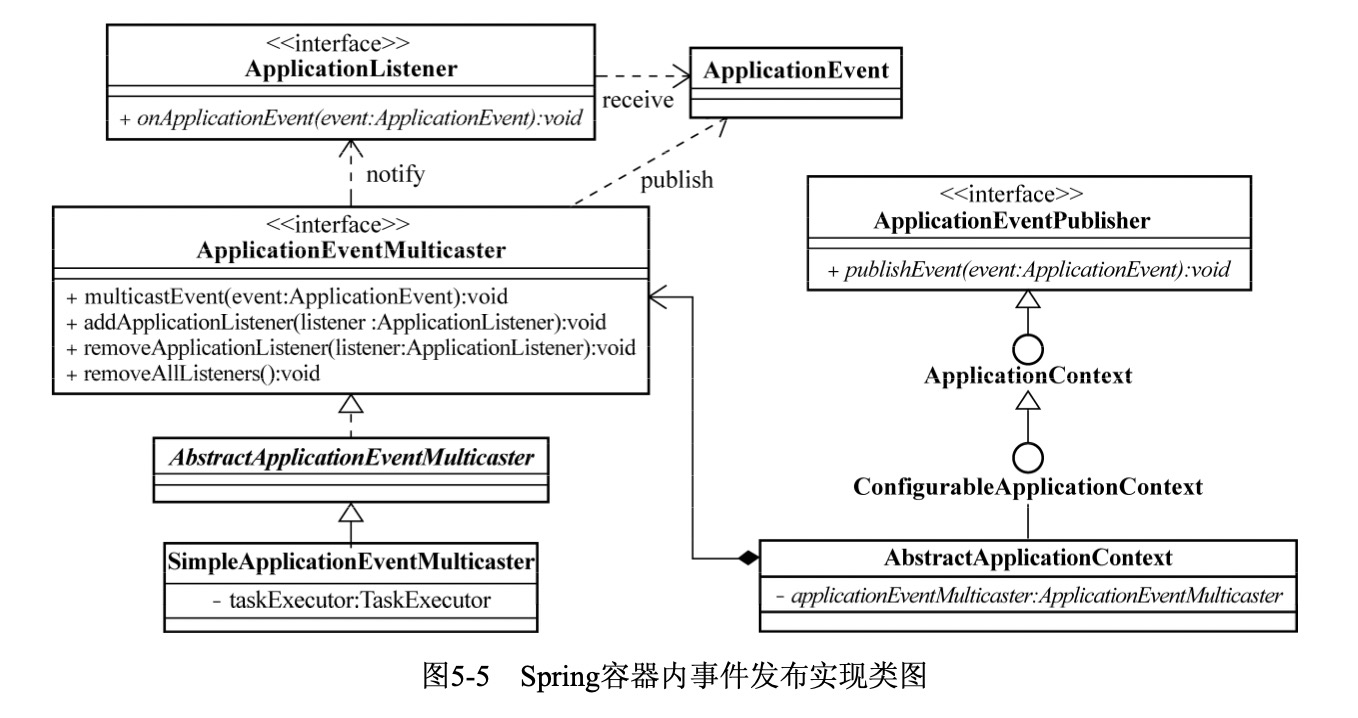
ApplicationContext容器的具体实现类在实现事件的发布和事件监听器的注册方面,并没事必躬亲,而是把这些活儿转包给了一个称作org.springframework.context.event.ApplicationEventMulticaster的接口。该接口定义了具体事件监听器的注册管理以及事件发布的方法,但接口终归是接口,还得有具体实现。ApplicationEventMulticaster有一抽象实现类org.springframework.context.event.AbstractApplicationEventMulticaster,它实现了事件监听器的管理功能。出于灵活性和扩展性考虑,事件的发布功能则委托给了其子类。
org.springframework. context.event.SimpleApplicationEventMulticaster是Spring提供的 AbstractApplicationEventMulticaster的一个子类实现,添加了事件发布功能的实现。不过,其默认使用了SyncTaskExecutor进行事件的发布。与我们给出的样例事件发布者实现一样,事件是同步顺序发布的。为了避免这种方式可能存在的性能问题,我们可以为其提供其他类型的TaskExecutor实现类(TaskExecutor的概念将在后面详细介绍)。
因为ApplicationContext容器的事件发布功能全部委托给了ApplicationEventMulticaster来做,所以,容器启动伊始,就会检查容器内是否存在名称为applicationEventMulticaster的 ApplicationEventMulticaster对象实例。有的话就使用提供的实现,没有则默认初始化一个 SimpleApplicationEventMulticaster作为将会使用的ApplicationEventMulticaster。这样,整个Spring容器内事件发布功能实现结构图就有了。
在看源码前我们先来复习一下AbstractApplicationContext这个抽象类都实现了什么接口
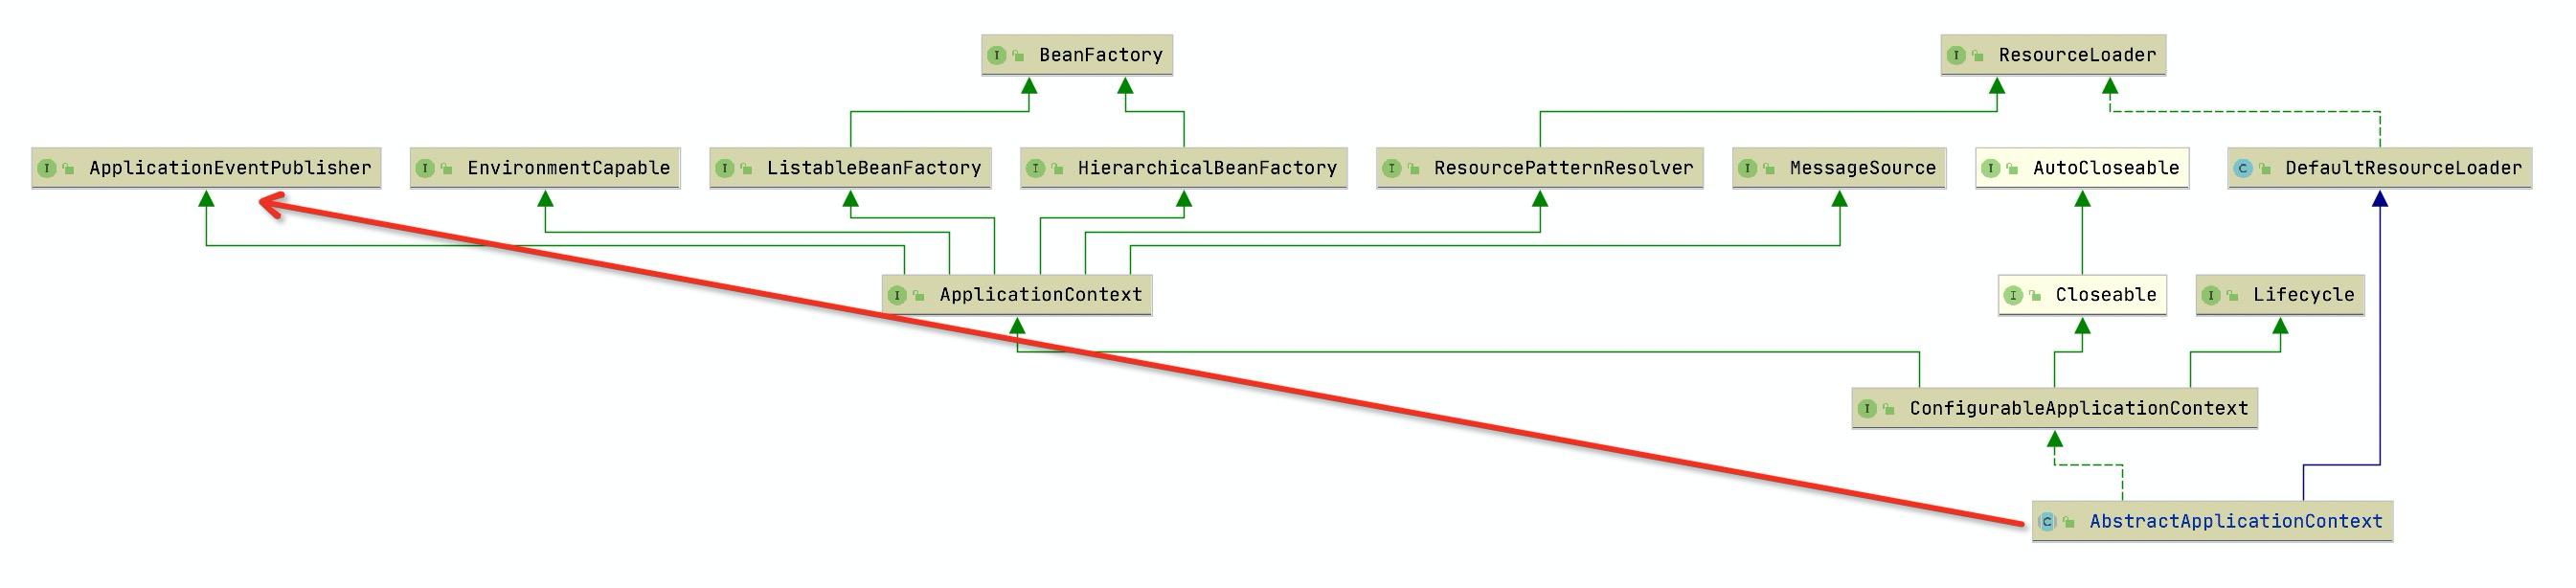
可以看到我们的ApplicationContext接口继承了ApplicationEventPublisher接口。我们先来看看这个接口都提供什么功能。
package org.springframework.context;

/**
 * Interface that encapsulates event publication functionality.
 *
 * 封装事件发布功能的接口
 *
 * <p>Serves as a super-interface for {@link ApplicationContext}.
 *
 * 作为ApplicationContext的父类接口
 *
 * @author Juergen Hoeller
 * @author Stephane Nicoll
 * @since 1.1.1
 * @see ApplicationContext
 * @see ApplicationEventPublisherAware
 * @see org.springframework.context.ApplicationEvent
 * @see org.springframework.context.event.ApplicationEventMulticaster
 * @see org.springframework.context.event.EventPublicationInterceptor
 */
@FunctionalInterface
public interface ApplicationEventPublisher {

	/**
	 * Notify all <strong>matching</strong> listeners registered with this
	 * application of an application event.
	 *
	 * 发布事件通知全部匹配的注册进容器的监听器
	 *
	 * Events may be framework events
	 * (such as ContextRefreshedEvent) or application-specific events.
	 *
	 * 事件必须是一个Spring框架内的或者是Spring应用的特殊事件
	 *
	 * <p>Such an event publication step is effectively a hand-off to the
	 * multicaster and does not imply synchronous/asynchronous execution
	 * or even immediate execution at all.
	 *
	 * 这样事件多播器可能是同步/异步执行,或者根本就不立刻执行
	 *
	 * Event listeners are encouraged
	 * to be as efficient as possible, individually using asynchronous
	 * execution for longer-running and potentially blocking operations.
	 *
	 * 事件监听器应尽可能快的处理事件,对于需要长时间运行或阻塞性的处理尽量使用异步
	 *
	 * @param event the event to publish
	 * @see #publishEvent(Object)
	 * @see org.springframework.context.event.ContextRefreshedEvent
	 * @see org.springframework.context.event.ContextClosedEvent
	 */
	default void publishEvent(ApplicationEvent event) {
		publishEvent((Object) event);
	}

	void publishEvent(Object event);

}
接下来看AbstractApplicationContext内ApplicationEventMulticaster是如何初始化定义和使用的
看ApplicationEventMulticaster是在何时发送事件
看ApplicationEventPublisher在AbstractApplicationContext的实现类内是如何实现的
public abstract class AbstractApplicationContext extends DefaultResourceLoader
		implements ConfigurableApplicationContext {

  //---------------------------------------------------------------------
	// ApplicationEventPublisher接口实现
	//---------------------------------------------------------------------

	@Override
	public void publishEvent(ApplicationEvent event) {
		publishEvent(event, null);
	}

	@Override
	public void publishEvent(Object event) {
		publishEvent(event, null);
	}

	protected void publishEvent(Object event, @Nullable ResolvableType eventType) {
		Assert.notNull(event, "Event must not be null");

		// Decorate event as an ApplicationEvent if necessary
		ApplicationEvent applicationEvent;
		if (event instanceof ApplicationEvent) {
			applicationEvent = (ApplicationEvent) event;
		}
		else {
			applicationEvent = new PayloadApplicationEvent<>(this, event);
			if (eventType == null) {
				eventType = ((PayloadApplicationEvent<?>) applicationEvent).getResolvableType();
			}
		}

		// Multicast right now if possible - or lazily once the multicaster is initialized
		if (this.earlyApplicationEvents != null) {
			this.earlyApplicationEvents.add(applicationEvent);
		}
		else {
      //在此处实现发送事件
			getApplicationEventMulticaster().multicastEvent(applicationEvent, eventType);
		}

		// Publish event via parent context as well...
		if (this.parent != null) {
			if (this.parent instanceof AbstractApplicationContext) {
				((AbstractApplicationContext) this.parent).publishEvent(event, eventType);
			}
			else {
				this.parent.publishEvent(event);
			}
		}
	}

  //---------------------------------------------------------------------
	// ApplicationEventMulticaster接口的初始化定义和使用
	//---------------------------------------------------------------------

  /**
	 * Name of the ApplicationEventMulticaster bean in the factory.
	 * If none is supplied, a default SimpleApplicationEventMulticaster is used.
	 * 容器内含有名称为APPLICATION_EVENT_MULTICASTER_BEAN_NAME的bean则使用
	 * @see org.springframework.context.event.ApplicationEventMulticaster
	 * @see org.springframework.context.event.SimpleApplicationEventMulticaster
	 */
	public static final String APPLICATION_EVENT_MULTICASTER_BEAN_NAME = "applicationEventMulticaster";

  /** Helper class used in event publishing.
	 * 事件监听器管理和发布事件
	 * 又叫事件多播器
	 * */
	@Nullable
	private ApplicationEventMulticaster applicationEventMulticaster;

	ApplicationEventMulticaster getApplicationEventMulticaster() throws IllegalStateException
  {
		... ...
		return this.applicationEventMulticaster;
	}

  //本方法为ConfigurableApplicationContext接口的方法
  //向容器内注册事件监听器
  @Override
	public void addApplicationListener(ApplicationListener<?> listener) {
		... ...
		this.applicationListeners.add(listener);
	}

  @Override
	public void refresh() throws BeansException, IllegalStateException {
		... ...
		// Initialize event multicaster for this context.
    //初始化事件监听器
		initApplicationEventMulticaster();
    ... ...
	}

  protected void initApplicationEventMulticaster() {
		ConfigurableListableBeanFactory beanFactory = getBeanFactory();
		if (beanFactory.containsLocalBean(APPLICATION_EVENT_MULTICASTER_BEAN_NAME)) {
			this.applicationEventMulticaster =
					beanFactory.getBean(APPLICATION_EVENT_MULTICASTER_BEAN_NAME, ApplicationEventMulticaster.class);
		}
		else {
			this.applicationEventMulticaster = new SimpleApplicationEventMulticaster(beanFactory);
			beanFactory.registerSingleton(APPLICATION_EVENT_MULTICASTER_BEAN_NAME, this.applicationEventMulticaster);
		}
	}

}
至此我们知道ApplicationContext实现ApplicationEventPublisher接口,并通过委托ApplicationEventMulticaster来管理事件监听器和发送事件,继续来看ApplicationEventMulticaster接口都定义了什么方法
/**
 * Interface to be implemented by objects that can manage a number of
 * {@link ApplicationListener} objects and publish events to them.
 *
 * 接口实现类可以管理多个ApplicationListener对象,并向其发布事件
 *
 * <p>An {@link org.springframework.context.ApplicationEventPublisher}, typically
 * a Spring {@link org.springframework.context.ApplicationContext}, can use an
 * {@code ApplicationEventMulticaster} as a delegate for actually publishing events.
 *
 * ApplicationEventPublishe实现类通常是Spring的ApplicationContext类的实现类,
 * ApplicationContext类的实现类会委派给ApplicationEventMulticaster的实现类来进行事件广播
 *
 * @author Rod Johnson
 * @author Juergen Hoeller
 * @author Stephane Nicoll
 * @see ApplicationListener
 */
public interface ApplicationEventMulticaster {

	/**
	 * Add a listener to be notified of all events.
	 * @param listener the listener to add
	 */
	void addApplicationListener(ApplicationListener<?> listener);

	/**
	 * Add a listener bean to be notified of all events.
	 * @param listenerBeanName the name of the listener bean to add
	 */
	void addApplicationListenerBean(String listenerBeanName);

	/**
	 * Remove a listener from the notification list.
	 * @param listener the listener to remove
	 */
	void removeApplicationListener(ApplicationListener<?> listener);

	/**
	 * Remove a listener bean from the notification list.
	 * @param listenerBeanName the name of the listener bean to remove
	 */
	void removeApplicationListenerBean(String listenerBeanName);

	/**
	 * Remove all listeners registered with this multicaster.
	 * <p>After a remove call, the multicaster will perform no action
	 * on event notification until new listeners are registered.
	 */
	void removeAllListeners();

	/**
	 * Multicast the given application event to appropriate listeners.
	 * <p>Consider using {@link #multicastEvent(ApplicationEvent, ResolvableType)}
	 * if possible as it provides better support for generics-based events.
	 * @param event the event to multicast
	 */
	void multicastEvent(ApplicationEvent event);

	/**
	 * Multicast the given application event to appropriate listeners.
	 * <p>If the {@code eventType} is {@code null}, a default type is built
	 * based on the {@code event} instance.
	 *
	 * 基于范型的事件类型来通知相关的监听器
	 *
	 * @param event the event to multicast
	 * @param eventType the type of event (can be {@code null})
	 * @since 4.2
	 */
	void multicastEvent(ApplicationEvent event, @Nullable ResolvableType eventType);

}
由此我们可以看到关键方法multicastEvent用来发送事件。至于ApplicationEventMulticaster接口的实现类则不继续追下去了
Spring 容器内事件发布的应用
Spring的ApplicationContext容器内的事件发布机制,主要用于单一容器内的简单消息通知和处理,并不适合分布式、多进程、多容器之间的事件通知。虽然可以通过Spring的Remoting支持,“曲 折一点”来实现较为复杂的需求,但是难免弊大于利,失大于得。其他消息机制处理较复杂场景或许更合适。所以,我们应该在合适的地点、合适的需求分析的前提下,合理地使用Spring提供的ApplicationContext容器内的事件发布机制。
要让我们的业务类支持容器内的事件发布,需要它拥有ApplicationEventPublisher的事件发 布支持。所以,需要为其注入ApplicationEventPublisher实例。可以通过如下两种方式为我们的 业务对象注入ApplicationEventPublisher的依赖。
-
使用ApplicationEventPublisherAware接口。在ApplicationContext类型的容器启动时, 会自动识别该类型的bean定义并将ApplicationContext容器本身作为ApplicationEventPublisher注入当前对象,而ApplicationContext容器本身就是一个ApplicationEventPublisher。
-
使用ApplicationContextAware接口。既然ApplicationContext本身就是一个ApplicationEventPublisher,那么通过ApplicationContextAware几乎达到第一种方式相同的效果。
/**
 * 自定义事件
 */
public class SpringMethodExecutionEvent extends ApplicationEvent {
	private static final long serialVersionUID = -71960369269303337L;
	private String methodName;
	private MethodExecutionStatus methodExecutionStatus;

	public SpringMethodExecutionEvent(Object source) {
		super(source);
	}

	public SpringMethodExecutionEvent(Object source, String methodName, MethodExecutionStatus methodExecutionStatus) {
		super(source);
		this.methodName = methodName;
		this.methodExecutionStatus = methodExecutionStatus;
	}

	public String getMethodName() {
		return methodName;

	}

	public void setMethodName(String methodName) {
		this.methodName = methodName;
	}

	public MethodExecutionStatus getMethodExecutionStatus() {
		return methodExecutionStatus;
	}

	public void setMethodExecutionStatus(MethodExecutionStatus methodExecutionStatus) {
		this.methodExecutionStatus = methodExecutionStatus;
	}
}
public class SpringMethodExecutionEventListener implements ApplicationListener {

	@Override
	public void onApplicationEvent(ApplicationEvent event) {
		if (event instanceof SpringMethodExecutionEvent) {
			// 执行处理逻辑
			Log.out("收到:" + ((SpringMethodExecutionEvent) event).getMethodName() + " 执行处理逻辑");
		} else {
			Log.out("收到:" + event);
		}
	}
}
public class SpringMethodExeuctionEventPublisher implements ApplicationEventPublisherAware {
	private ApplicationEventPublisher eventPublisher;

	public void methodToMonitor() {
		SpringMethodExecutionEvent beginEvt = new SpringMethodExecutionEvent(this, "methodToMonitor", MethodExecutionStatus.BEGIN);
		this.eventPublisher.publishEvent(beginEvt);
		// 执行实际方法逻辑
		Log.out("执行实际方法逻辑");
		SpringMethodExecutionEvent endEvt = new SpringMethodExecutionEvent(this, "methodToMonitor", MethodExecutionStatus.END);
		this.eventPublisher.publishEvent(endEvt);
	}

	public void setApplicationEventPublisher(ApplicationEventPublisher eventPublisher) {
		this.eventPublisher = eventPublisher;
	}

	public static void main(String[] args) {
		ClassPathXmlApplicationContext context = new ClassPathXmlApplicationContext("SpringMethodExeuctionEventPublisher-ApplicationContext.xml");
		/**
		 * 通过手动注册bean方式
		 * 自己生成BeanDefinition
		 * 将BeanDefinition定义注册到BeanFactory
		 * 通过自己调用getBean方法将bean实例交给Spring管理
		 */
		DefaultListableBeanFactory beanFactory = (DefaultListableBeanFactory) context.getBeanFactory();
		AbstractBeanDefinition definition = new RootBeanDefinition(SpringMethodExecutionEventListener.class, AbstractBeanDefinition.AUTOWIRE_NO, true);
		beanFactory.registerBeanDefinition("springMethodExecutionEventListener", definition);
		Object springMethodExecutionEventListener = context.getBean("springMethodExecutionEventListener");
		//可以将此处以上注释,打开xml配置文件注释

		SpringMethodExeuctionEventPublisher bean = context.getBean(SpringMethodExeuctionEventPublisher.class);
		bean.methodToMonitor();
	}

}

//--------
//输出
 0  |  收到:methodToMonitor 执行处理逻辑
 1  |  执行实际方法逻辑
 2  |  收到:methodToMonitor 执行处理逻辑
<beans xmlns="http://www.springframework.org/schema/beans" xmlns:xsi="http://www.w3.org/2001/XMLSchema-instance"
	   xsi:schemaLocation="http://www.springframework.org/schema/beans
		http://www.springframework.org/schema/beans/spring-beans-2.0.xsd">

	<bean id="springMethodExeuctionEventPublisher" class="com.mm.demo.event.SpringMethodExeuctionEventPublisher"/>
	<!--	通过手动方式注册bean 也可注释掉main方法中打开此处注释-->
	<!--	<bean id="springMethodExecutionEventListener" class="com.mm.demo.event.SpringMethodExecutionEventListener"/>-->

</beans>
多配置模块加载的简化
实际上,这也不算ApplicationContext比较突出的特色功能,只是相对于BeanFactory来说, 在这一点上做得更好罢了。
我们知道,在使用Spring的IoC轻量级容器进行实际开发的过程中,为了避免出现整个团队因某个 资源独占而无法并行、高效地完成工作等问题,通常会将整个系统的配置信息按照某种关注点进行分割,使得关注点逻辑良好地划分到不同的配置文件中,如按照功能模块或者按照系统划分的层次等。 这样,在加载整个系统的bean定义时,就需要让容器同时读入划分到不同配置文件的信息。相对于 BeanFactory来说,ApplicationContext大大简化了这种情况下的多配置文件的加载工作。
假设在文件系统中存在多个Spring的配置文件,它们所在路径如下所示:
{user.dir}/conf/dao-tier.springxml
{user.dir}/conf/view-tier.springxml
通过ApplicationContext,我们只要以String[]形式传入这些配置文件所在的路径,即可构造并启动容器
结语
ApplicationContext是Spring在BeanFactory基础容器之上,提供的另一个IoC容器实现。它拥有许多BeanFactory所没有的特性,包括统一的资源加载策略、国际化信息支持、容器内事件发布以及简化的多配置文件加载功能。本章对ApplicationContext的这些新增特性进行了详尽的阐述。希望读者在学习完本章内容之后,对每一种特性的来龙去脉都能了如指掌。